Winter 2021

Welcome from EUS-AAEM
The Emergency Ultrasound Section of the American Academy of Emergency Medicine (EUS-AAEM) is founded to foster the professional development of its members and to educate them regarding point-of-care ultrasound. This group will serve as a venue for collaboration among medical students, residents and practitioners who are interested in point-of-care ultrasound. The purpose of our group is to augment the knowledge and expertise of all emergency medicine specialists and to advocate for patient safety and quality care by endorsing bedside ultrasound. Membership is not limited to fellowship trained physicians. All emergency medicine practitioners passionate about ultrasound are welcome to join and participate.
We are proud to publish our e-newsletter with original contributions from many of our members. We encourage all members to submit for future editions. Topics include but are not limited to educational, community focus, interesting cases, resident and student section, and adventures abroad.
For more information visit us online at: www.aaem.org/EUS.
In this Issue:
-
President's Message
-
Help Wanted: Speakers
-
An Opportunity for EMIGs
-
Ultrasound Building Blocks: Back to Basics: Measuring Gestational Age
-
Providing healthcare to rural populations with Real Time Remote Telementored Ultrasound
-
Glimpse of Original Research: Utility of Bedside Ocular Ultrasound in Trauma Setting: Simulated Injuries
-
Fellow Section: Using Musculoskeletal Ultrasound to Improve Care in Fast-Track Areas
-
Education Section: Near Peer Ultrasound Teaching: A Pilot Program in Ultrasound Training in Medical School
-
Ultrasound Guided Procedures: Ultrasound Guided Lateral Femoral Cutaneous Nerve Block for Meralgia Paresthetica
-
Ultrasound Saves: Point-of-Care Ultrasound (POCUS) for Abdominal Wall Tumor
President’s Message
The Emergency Ultrasound section has had a very productive year, and we look forward to an ever better 2022. As a Section, we are a vibrant and growing part of AAEM, with multiple projects ongoing to teach ultrasound to Emergency Physicians across the country.
The “Unmute Your Probe” webinar series continues to offer twice monthly basic and advanced lectures on a variety of topics which have received excellent reviews. Section members gave multiple talks and led workshops at AAEM 2021 Scientific Assembly (SA) and will continue to teach with multiple workshops accepted for the 2022 Scientific Assembly. “The POCUS Report” published multiple issues highlighting the use of ultrasound in the Emergency Department.
One of my main goals as president has been to start a speakers bureau to connect residents and ultrasound fellows with medical student groups. The section will provide a list of suggested topics to the interest groups as well as providing speakers with several slide sets to use if they choose as a basis for lectures. We are aiming to connect the next generation of leaders in point of care ultrasound (POCUS) with interest groups that are excited about POCUS. This initiative is ready to launch and I look forward to seeing the first lectures later this spring.
It has been an honor to serve as the president of this section. Dr. Allison Zanaboni, the chair-elect, will take over at the 2022 SA. I am excited to see what the section accomplishes under her leadership.
Melissa Myers, MD FAAEM - Chair, EUS-AAEM
Help Wanted: Speakers
The Emergency Ultrasound Section is looking for interested residents, fellows and faculty to speak with medical school Emergency Medicine Interest Groups and Ultrasound Interest Groups about the use of point of care ultrasound in the Emergency Department.
The section will provide a list of suggested topics to the Interest Groups, as well as providing you with several slide sets to use if you choose as a basis for lectures. This is a great opportunity for anyone interested in sparking interest in the next generation of Emergency Physicians in the use of point of care ultrasound in the Emergency Department! Interested physicians should sign up here.
An Opportunity for EMIGs
The American Academy of Emergency Medicine Emergency Ultrasound Section has an exciting new opportunity focused on providing emergency ultrasound education to groups like yours. The section has compiled a group of point of care ultrasound enthusiasts who are making themselves available to give virtual talks on a variety of emergency ultrasound topics. This is a great chance to get directed education on an exciting and ever expanding diagnostic topic directed to your group's specific interest. If you think your group would be interested in taking advantage of this opportunity, please sign up through the sign-up link below.
Please designate your interest on this worksheet.
Ultrasound Building Blocks
Back to Basics: Measuring Gestational Age
Samantha King, MD and Alexis Salerno, MD
In the emergency department, it is very important to be able to measure the gestational age of a pregnant patient. By knowing the gestational age, emergency physicians can titer management and alter their differential. In this article, we will discuss the various ways to measure gestational age. The curvilinear probe in OB mode is used when scanning for the gestational age on a transabdominal ultrasound.
Early Pregnancy: Mean Gestational Sac Diameter
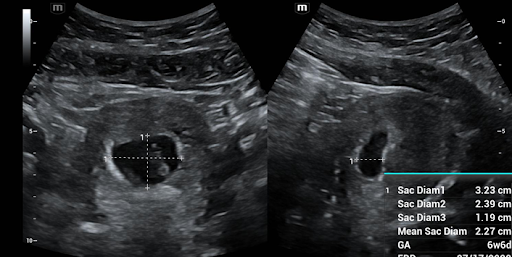
To measure the gestational sac, first locate the pregnancy and decrease the depth to maximize the size of the sac on the screen. Rotate and fan through the sac to locate the largest diameter of the sac. If your ultrasound allows, zoom in on the sac to maximize the accuracy of the measurement. Freeze your image. You will first measure the height (G1) and the width (G2) in this view to make a “+” sign. These measurements should be inner wall to inner wall of the gestational sac. Once these calculations are obtained and measurements save, you will rotate the probe 90 degrees to be orthogonal to your initial view. Again, zoom if able and then freeze the image. In this second image, you will measure just the length (G3) forming a “-” sign. If your machine has a calculation software packet you can then use the machine calculations to calculate the gestational age. As a reminder, in order to diagnose an intrauterine pregnancy, you must also see a yolk sac. Some ectopic pregnancies can also present with a pseudo gestational sac. (Figure 1)
First Trimester: Crown Rump Length
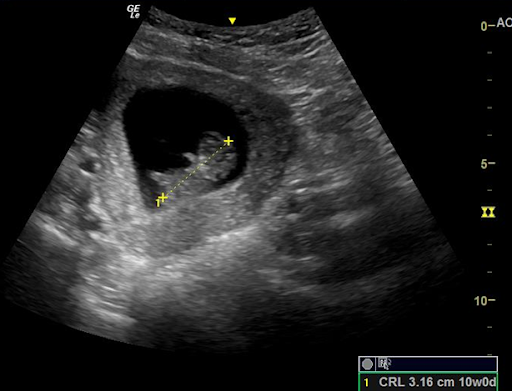
To measure crown rump length (CRL), you will need to similarly first locate the pregnancy, center it on your screen, and maximize the size of the pregnancy on your screen by adjusting the depth of the image. You then need to identify the fetal pole which should be positioned next to the yolk sac within the gestational sac. Next, rotate and fan to maximize the length of the fetal pole. Once the maximum length has been found, you can then zoom to optimize your image. Freeze the image and then measure from 1 tip of the fetal pole to the other making sure NOT to include any yolk sac, using the calculation function to generate a gestational age. Remember that once a fetal pole is able to flex and extend that this measurement is not nearly as accurate and other measurements should be obtained for estimation of gestational age. (Figure 2)
Late First Trimester/Second Trimester: Biparietal Diameter
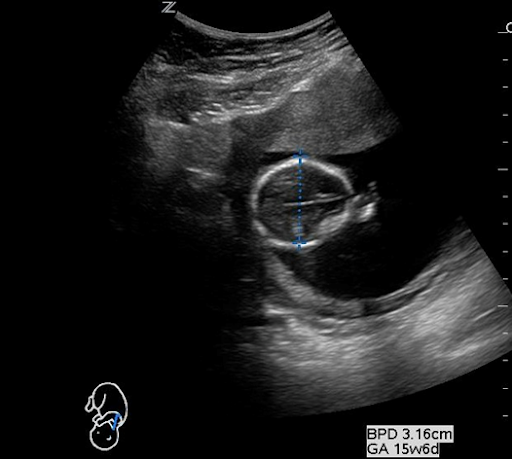
The Bi-Parietal Diameter (BPD) is measured in the transverse section of the fetal head at the level of the thalami and can be one of the most challenging methods of estimating fetal age. BPD is most commonly used in the late first trimester to about 20 weeks. When measuring the BPD it is important to align the head so that the midline falax and both thalami are visualized. Once you obtain correct positioning, measure from “leading edge to leading edge,” or from the outer edge of the anterior skull to the inner edge of the posterior skull. For a more accurate measurement, the measurement calibers should be placed at the parietal bone which is the widest width of the fetal skull. It may also help to zoom in on the image to obtain a more accurate measurement. (Figure 3)
Late Second Trimester/Third Trimester: Femur Length
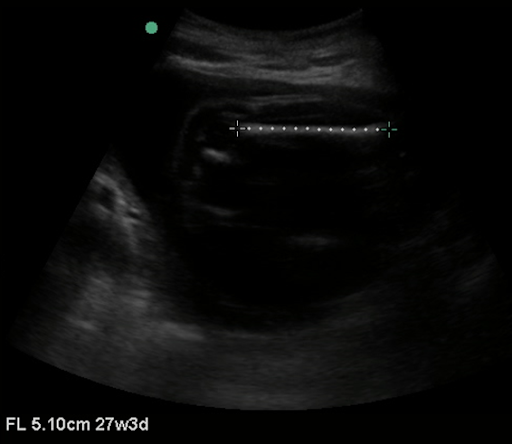
Femur length is more accurate than BPD in late pregnancy and is one of the easiest measurements to obtain. To measure the femur length, obtain a still image with the entire femur in view. Measure parallel to the femur in order to obtain femur length. It is important to only include the osseous structures in the measurement. (Figure 4)
Providing Healthcare to Rural Populations with Real Time Remote Telementored Ultrasound
Katy Wyszynski, OMS-II, MS
John Gibson, MD
Lesca Hadley, MD
Background
Medical students at the University of North Texas Health Science Center Texas College of Osteopathic Medicine are encouraged to utilize ultrasound outside of the classroom, as TCOM has a growing ultrasound curriculum in both preclinical and clinical medical education. In the summer of 2021, a group of second year medical students traveled to West Texas to provide healthcare screenings to rural populations. Ultrasound scans were offered to patients using the Butterfly handheld probe. Even though TCOM’s ultrasound director was not on this trip, students utilized Butterfly’s teleguidance technology to perform complex scans for the first time. This technology allows a two-way video call, so that the remote practitioner visualizes in real time the ultrasound scan as well as the probe location on the patient. In addition, the remote practitioner can change the depth and gain, and make annotations on the scan.
Case presentation
A 62-year-old Hispanic female was seen in clinic in a town on the border of Texas and Mexico. She presented to the clinic for a wellness check and to be evaluated for a previously diagnosed heart murmur, without any specific cardiac complaints at the time of the visit. This patient had a history of a congenital heart disease, which she believes she had surgery for shortly after birth. She was previously told that with weight loss her heart murmur would improve, and she was curious about the validity of this statement. She was also curious if she needed to follow-up with a cardiologist because it had been years since her last cardiology evaluation.
On physical exam, her P 80, BP was 138/100, RR 16, blood glucose 112, and BMI 28.59. She had a 2/6 systolic ejection murmur, without any adventitious lung sounds or bruits.
After the murmur was heard on physical exam, a point of care cardiac ultrasound was performed on the patient. The scan was performed by a second-year medical student with real time remote telementored ultrasound (RTMUS) guidance from Dr. Gibson, ultrasound director at TCOM. A parasternal long axis, parasternal short axis, and an apical four chamber view were obtained with his guidance.
On POCUS examination, the patient had a grossly normal parasternal long axis and parasternal short axis views. There was no mitral or aortic regurgitation, as identified with color flow doppler. Dr. Gibson was able to visually estimate a normal ejection fraction. However, there was one anatomical location at the base of the patient’s interventricular septum that appeared thin. From her medical history and cardiac imaging, Dr. Gibson approximated that she had a previous ventricular septal defect (VSD) at birth that closed spontaneously.
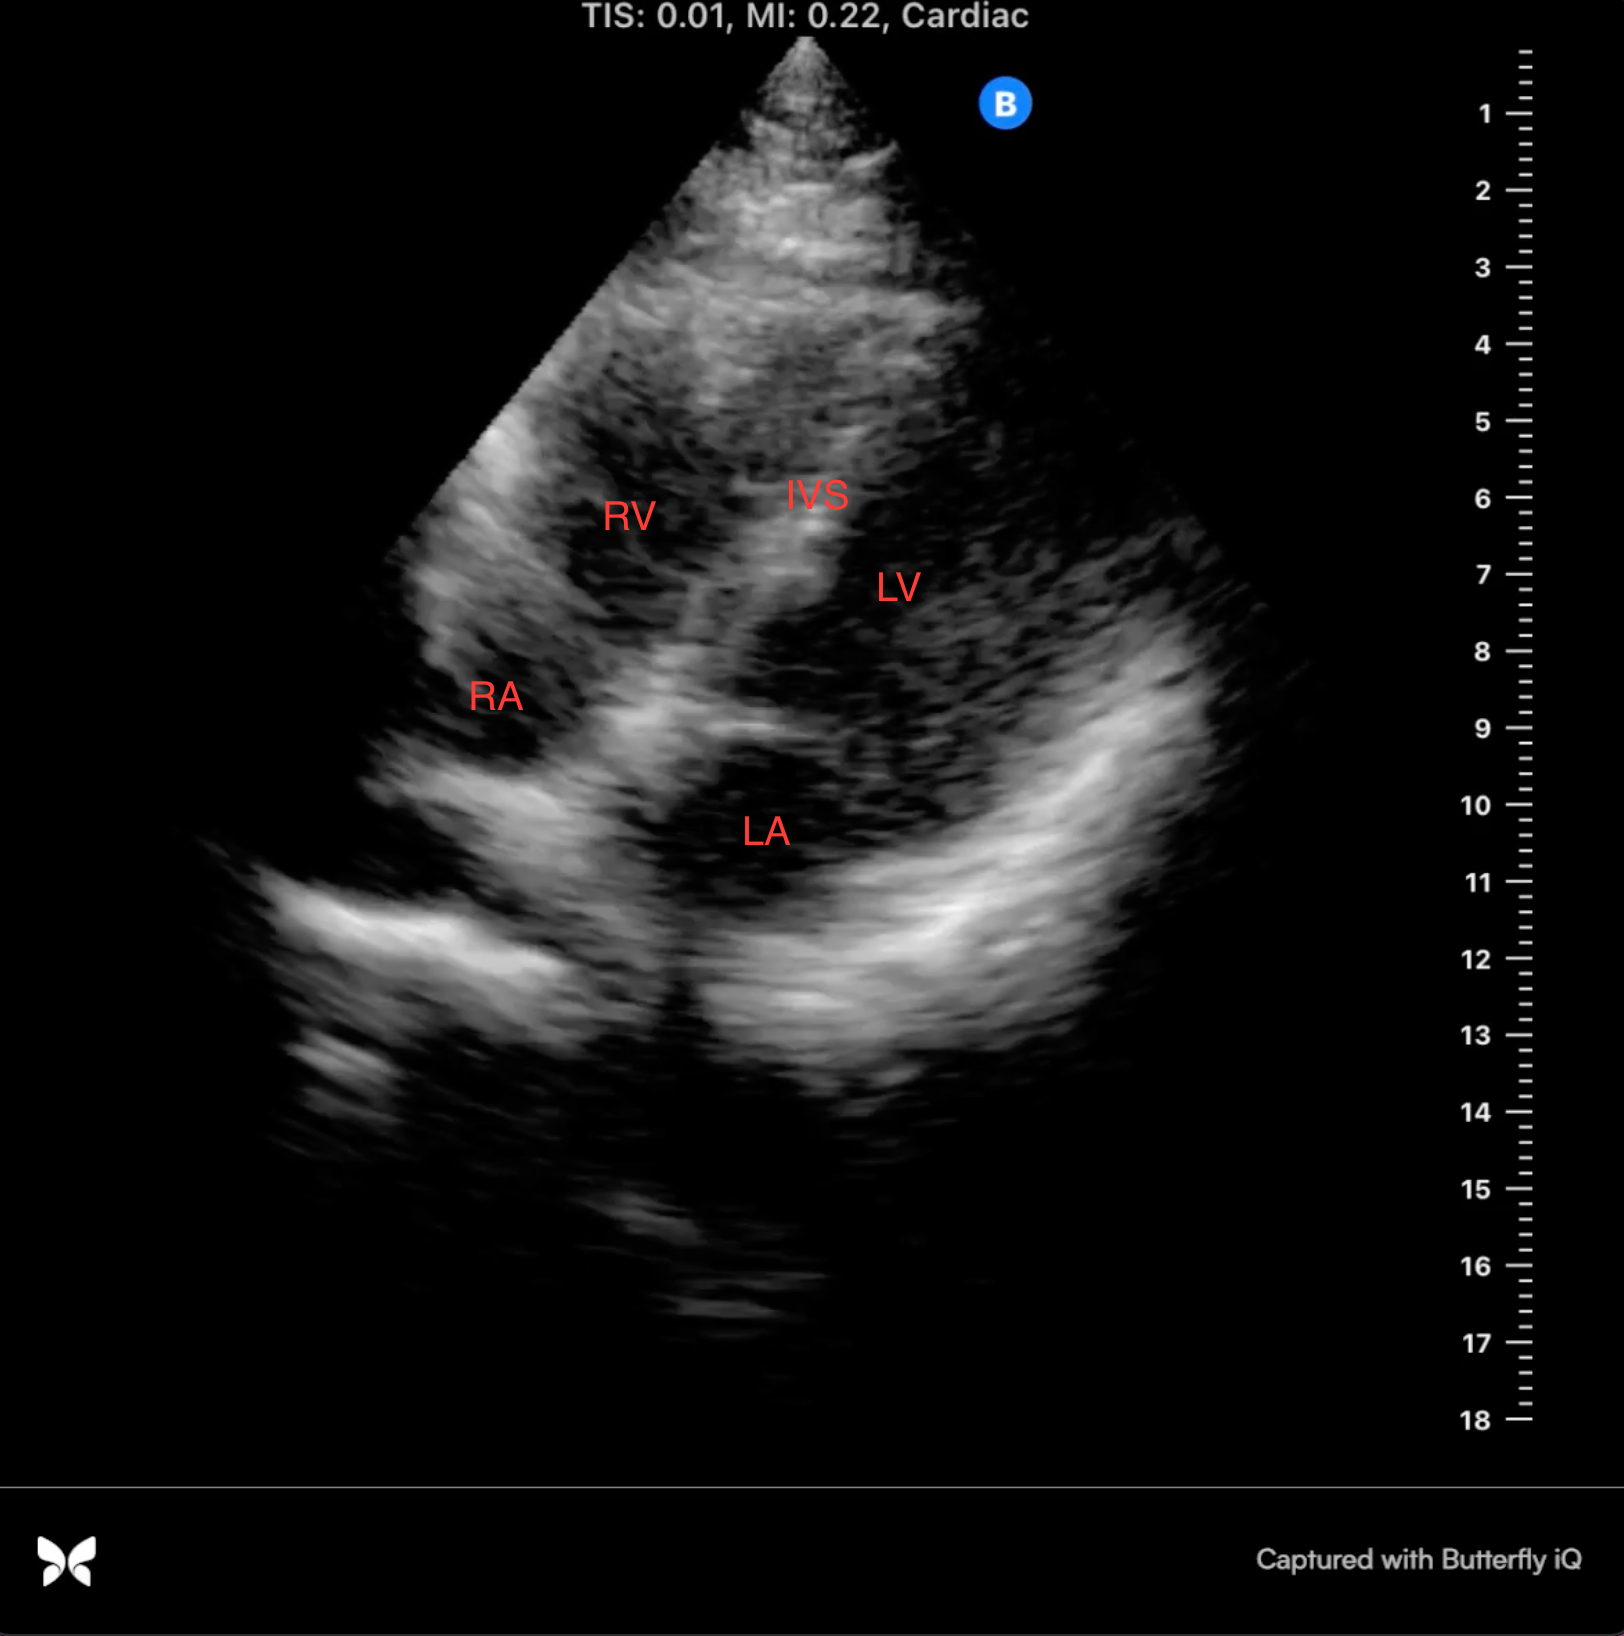
Image 1: apical 4 chamber view, mid-systole
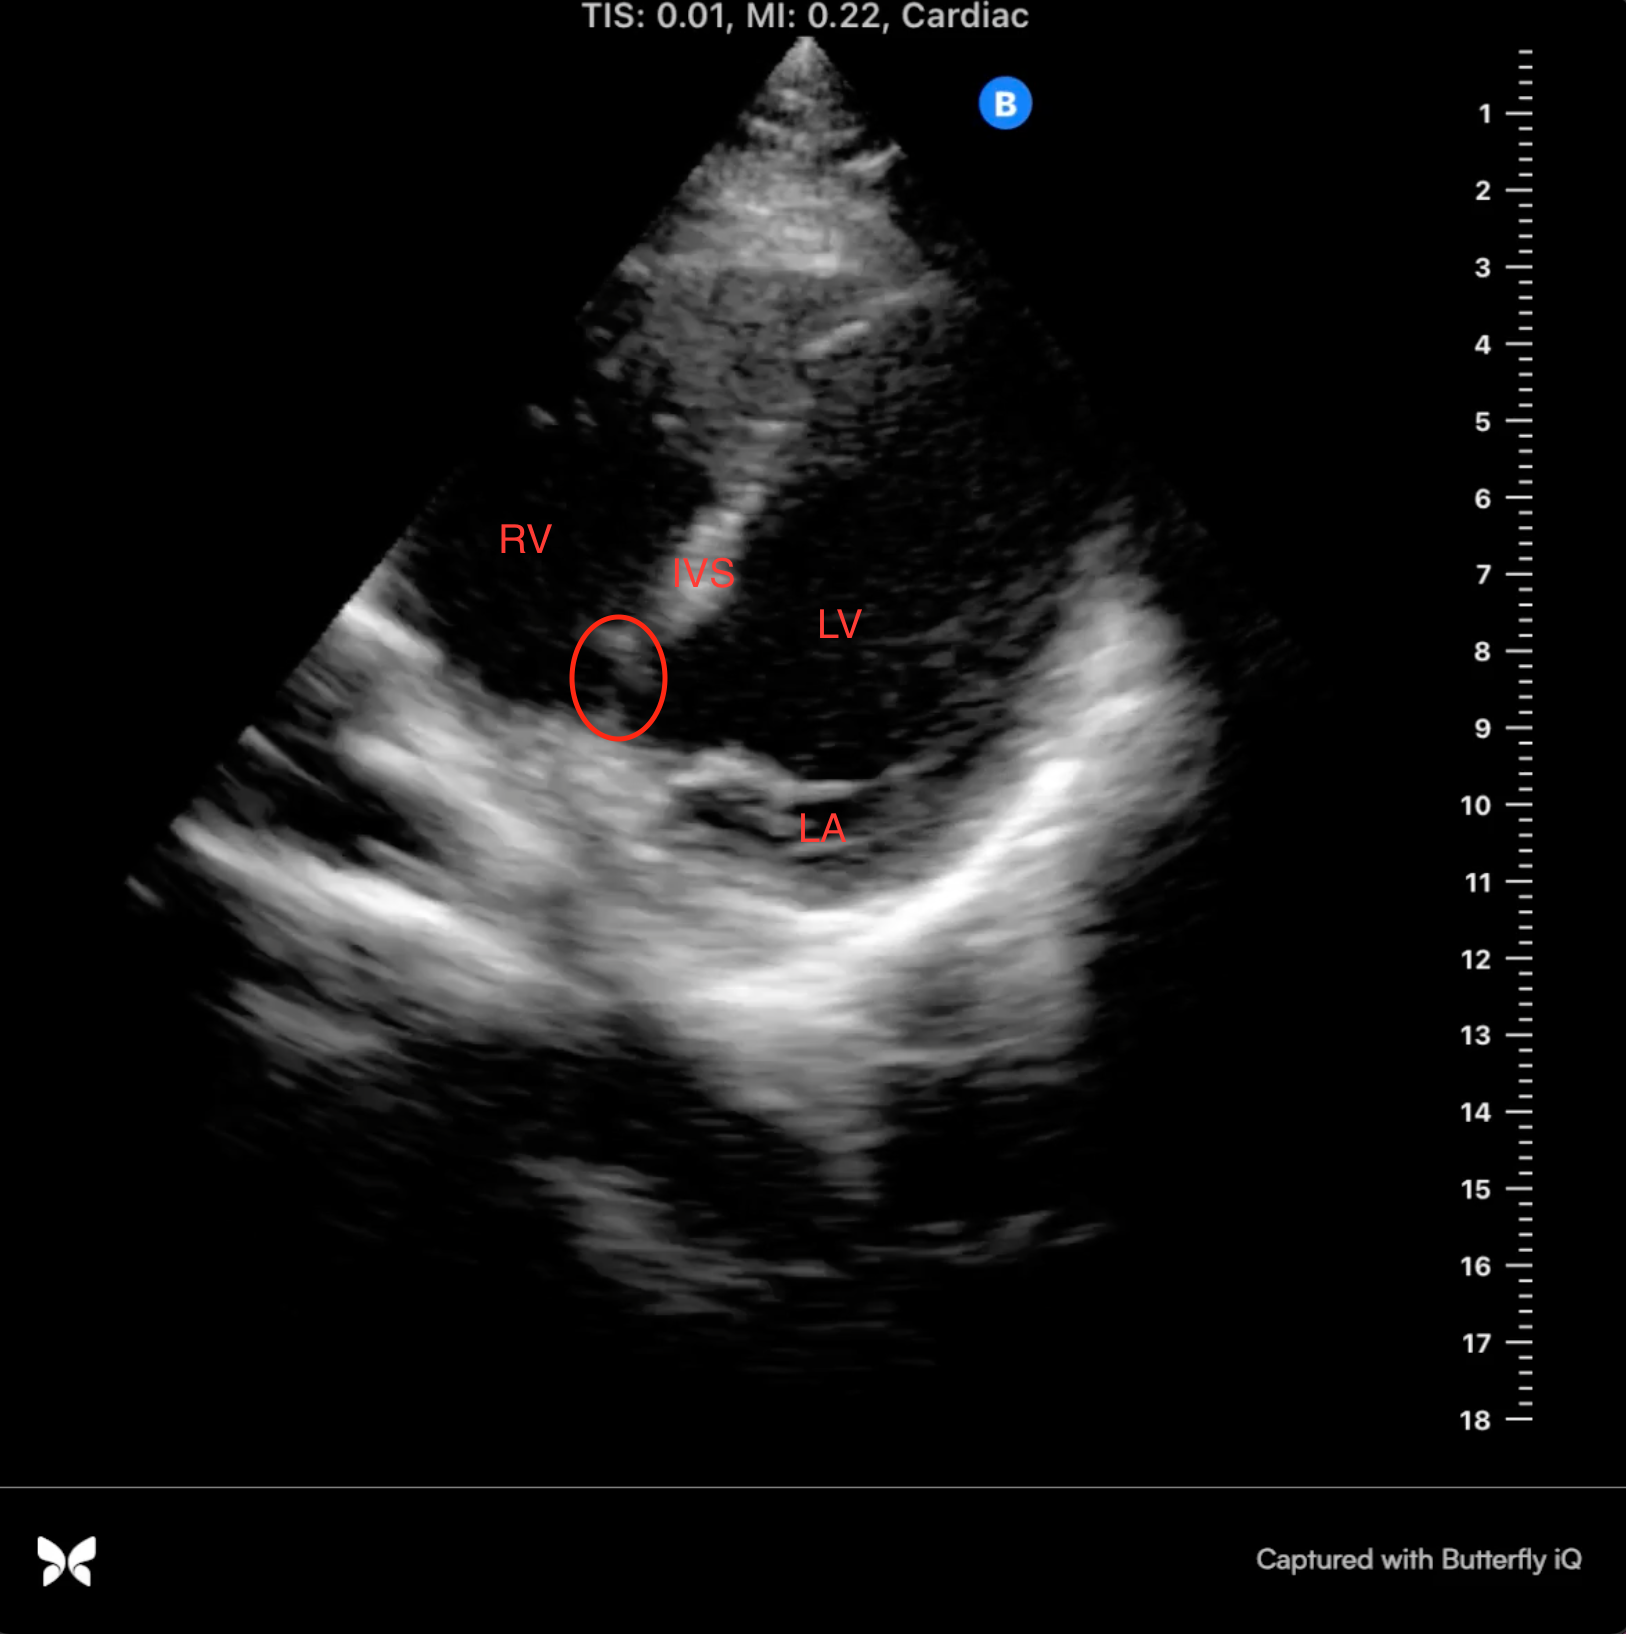
Image 2: apical 4 chamber view, mid-diastole
Discussion
There are a few important learning points from this case. One, is that physicians can obtain additional information using POCUS rather than relying on physical examination alone. This patient presented with a history of heart murmur, and a murmur was heard on physical exam. By conducting a POCUS study at bedside, we were able to diagnose her previous VSD and conclude that heart function and ejection fraction were grossly normal.
Second, is that through the use of RTMUS physicians were able to bring advanced technology into a rural setting. For many of these patients living on the Texas-Mexico border, their access to healthcare is sporadic, obtaining care from providers in both Texas and Mexico. Our patient was concerned about her need to follow up with a cardiologist immediately. With a basic heart scan, we provided reassurance about the structure and function of her heart and we recommended that she follow up with cardiology as well as counsel her that weight loss would not resolve her murmur.
Finally, this case study illustrates the feasibility of using RTMUS to assist with medical student learning1. This is a unique method to provide students autonomy and self-learning with clinician oversight2. In this case, the use of RTMUS allowed a second-year medical student to perform relatively difficult scans on patients with pathology. It was an invaluable experience being able to practice scans on patients at such an early point in preclinical training.
Conclusion
RTMUS allowed novice ultrasound users to perform various scans, such as cardiac imaging, with real-time feedback from a physician with vast ultrasound experience. In addition, this allowed the physician, who was working hundreds of miles away, to diagnose patients in rural West Texas. RTMUS is a relatively new technology but has great potential in both the instruction of novice ultrasound users and for remote healthcare delivery. We anticipate medical professionals and trainees will increase the usage of teleguided ultrasound in the coming years.
References
1. Leung DJ, Amundson S, Phan J, et al. (2018). Smartphone teleguidance in learning to obtain point-of-care cardiac ultrasound images from within the hospital: A pilot study using novice leaners. American College of Cardiology, 71(11).
2. Baribeu Y, Sharkey A, Chaudhary O, et al. (2020). Handheld point-of-care ultrasound probes: The new generation of POCUS. Journal of Cardiothoracic and Vascular Anesthesia. 34, 3139-3145. DOI: 10.1053/j.jvca.2020.07.004
Glimpse of Original Research
Utility of Bedside Ocular Ultrasound in Trauma Setting: Simulated Injuries
Alejandro Cardenas1, MD, Evan Yates1, DO, Gerardo Fernandez1, MD, Shterna Seligson1, PAC, Gregory McWhir1, DO, Beshoy Geris1, MD, Golnar Pashmforoosh1, MD, Frosso Adamakos1, MD, Getenet Tolera1, RN, Anisha Duvvi1, Ceilim Kim1, Roger Chirurgi1, MD, Hossein Kalantari1, MD, MPH, Hussein Matari2, MD, Getaw Worku Hassen1
1NYMC, Metropolitan Hospital Center, Department of Emergency Medicine, New York, NY
2NYMC, Metropolitan Hospital Center, Department of Radiology, New York, NY
Abstract:
Background:
Ocular trauma is a common injury worldwide 1. The incidence of eye injury varies by region and country and it is estimated to be present in varying degrees of injury severity, leading to visual impairment up to 60.5% of patients. Open eye wounds are present in 8.3% of cases 2. Ocular trauma represents 3% of all cases in the ED. CT scan of the face and head are the preferred diagnostic modality of these injuries. The CT scan can visualize bony injuries, ocular injuries and injuries to the surrounding soft tissue 3-7. An uncommon diagnostic tool is magnetic resonance imaging (MRI), however this modality is contraindicated for metallic foreign bodies and it is either not readily available or it is of limited use in some hospitals 8,9. Ultrasound (US) is a commonly and frequently used non-invasive point of care (POC) diagnostic aid in the ED 10-12. It can provide a quick assessment and help guide management and aid further planning.
Objective:
The objective of this study was to evaluate the utility of point of care ultrasound (POCUS) in assessing globe injury, as well as assessing the sequelae of performing ultrasound for intraocular tissue protrusion in simulated trauma scenarios.
Methods:
A 3D-printed skull with a pair of fresh lamb eyes inserted in the orbits was used for this study. Injuries were simulated using different size needles and a size 11 blade scalpel.
Results:
A total of 20 lamb eyes were divided into groups and used for the experiment. Group one - foreign body in situ inside the orbit. Group two - foreign body removed after causing injury to globe laterally. Group three -foreign body not removed after causing injury to globe laterally. Group four - foreign body removed after causing injury to the cornea. Group five - foreign body not removed after causing injury to the cornea. We used a normal eye for comparison and one group with blunt trauma. Blunt trauma was caused by slamming the eye on the floor while wrapped in a surgical glove.
Pressure applied to smaller lateral wall laceration using the ultrasound probe as well as with Q-tip did not result in protrusion of intraocular tissue. We pressed hard on the globe, but larger size lacerations (> 3cm) to the lateral wall of the globe that were then pressed with a Q-tip led to a protrusion of the vitreous body. As for injuries to the anterior chamber through the cornea, the fluid leakage occurred immediately if the foreign body was removed. The anterior chamber collapsed and no pressure recording was possible. If the foreign body was left in place, no fluid leakage was visible. The foreign body served as a tamponade. Pressure applied also showed no fluid leakage as long as the foreign body was left in site, allowing POCUS assessment of the entire globe and the extent of intraocular injury such as retinal damage.
The results of the experiments are summarized in table form (Table 1 and Figures 1 and 2). No tissue protrusion was seen with POCUS.
Conclusion:
Carefully performed POCUS did not show any protrusion of the intraocular tissue during the ultrasound procedure and no change in the anterior chamber size as a sign of increased intraocular pressure (IOP) when simulating injury in the lateral globe. POCUS can be performed in ocular trauma if the provider is experienced.
Table 1
A. Injury Patterns with Foreign body in Situ
| Eye | Injury type | Fluorescence test before injury | Fluorescence test after injury | Q-tip pressure test after injury | Ultrasound result |
| 1 | Corneal size 11 blade scalpel stab wound in situ | no fluid leakage | no fluid leakage | no fluid leakage | no fluid leakage, intraocular Foreign body identified |
| 2 | Cornea 18G needle puncture wound in situ | no fluid leakage | no fluid leakage | no fluid leakage | no fluid leakage, intraocular Foreign body identified |
| 3 | Cornea size 0 needle puncture in situ | no fluid leakage | no fluid leakage | no fluid leakage | no fluid leakage, intraocular Foreign body identified |
| 4 | Lateral globe size 11 blade scalpel stab wound in situ | no fluid leakage | no fluid leakage | no fluid leakage | no fluid leakage, intraocular Foreign body identified |
| 5 | Lateral globe 18G needle puncture wound in situ | no fluid leakage | no fluid leakage | no fluid leakage | no fluid leakage, intraocular Foreign body identified |
| 6 | Lateral globe size 0 needle puncture wound in situ | no fluid leakage | no fluid leakage | no fluid leakage | no fluid leakage, intraocular Foreign body identified, no vitreous body protrusion |
B. Injury Patterns after removing the Foreign body
| Eye | Injury type | Fluorescence test before injury | Fluorescence test after injury | Q-tip pressure test after injury | Ultrasound result |
| 7 | Corneal size 11 blade scalpel stab wound removed | fluid leakage | fluid leakage (+ Seidel sign) | fluid leakage | no fluid leakage since fluid leaked out already |
| 8 | Corneal 18G needle puncture wound removed | fluid leakage | fluid leakage (+ Seidel sign) | fluid leakage | no fluid leakage since fluid leaked out already |
| 9 | Corneal size 0 needle puncture wound removed | fluid leakage | fluid leakage (+ Seidel sign) | fluid leakage | no fluid leakage since fluid leaked out already |
| 10 | Lateral globe size 11 blade scalpel stab wound removed | no fluid leakage | no fluid leakage | no fluid leakage, no vitreous body protrusion | no fluid leakage, no vitreous body protrusion |
| 11 | Lateral globe 18G needle puncture wound removed | no fluid leakage | no fluid leakage | no fluid leakage, no vitreous body protrusion | no fluid leakage, no vitreous body protrusion |
| 12 | Lateral globe size 0 needle puncture wound removed | no fluid leakage | no fluid leakage | no fluid leakage, no vitreous body protrusion | no fluid leakage, no vitreous body protrusion |
| 13 | Ateral globe large laceration with partial protrusion of vitreous body | no fluid leakage | no fluid leakage | no fluid leakage, vitreous body protrusion | no fluid leakage, no vitreous body protrusion |
C. Other Injury Patterns and Controls
| Eye | Injury type | Fluorescence test before injury | Fluorescence test after injury | Q-tip pressure test after injury | Ultrasound result |
| 14 | size 11 blade Scalpel stab wound with retinal injury | no fluid leakage | no fluid leakage | no fluid leakage | no fluid leakage , intraocular foreign body identified, retinal flap and vitreous hemorrhage |
| 15 | 18 G needle with retinal injury | no fluid leakage | no fluid leakage | no fluid leakage | no fluid leakage , intraocular foreign body identified, retinal flap and vitreous hemorrhage |
| 16 | blunt trauma | no fluid leakage | no fluid leakage | no fluid leakage | lens dislocation identified |
| 17 | uninjured eye | no fluid leakage | no fluid leakage | no fluid leakage | no fluid leakage, no lens dislocation |
| 18 | uninjured eye | no fluid leakage | no fluid leakage | no fluid leakage | no fluid leakage, no lens dislocation |
| 19 | uninjured eye with foreign body in orbit only | no fluid leakage | no fluid leakage | no fluid leakage | no fluid leakage, foreign body identified in the orbit |
| 20 | uninjured eye with foreign body in orbit only | no fluid leakage | no fluid leakage | no fluid leakage | no fluid leakage, foreign body identified in the orbit |
Figure 1
Figure 2
References:
1. Negrel, AD Thylefors, B. The global impact of eye injuries. Ophthalmic Epidemiol 5, 143-169 (1998).
2. Vaziri, K., Schwartz, SG., Flynn, HW., Jr., Kishor, KS. Moshfeghi, AA. Eye-related Emergency Department Visits in the United States, 2010. Ophthalmology 123, 917-919, doi:10.1016/j.ophtha.2015.10.032 (2016).
3. Kubal, W. S. Imaging of orbital trauma. Radiographics 28, 1729-1739, doi:10.1148/rg.286085523 (2008).
4. Winegar, B. A. Gutierrez, J. E. Imaging of Orbital Trauma and Emergent Non-traumatic Conditions. Neuroimaging Clin N Am 25, 439-456, doi:10.1016/j.nic.2015.05.007 (2015).
5. Gad, K., Singman, E. L., Nadgir, R. N., Yousem, D. M. & Pillai, J. J. CT in the Evaluation of Acute Injuries of the Anterior Eye Segment. AJR Am J Roentgenol 209, 1353-1359, doi:10.2214/AJR.17.18279 (2017).
6. Lakits A, Prokesch R, Scholda C, Nowotny R, Kaider A, Bankier A. Helical and conventional CT in the imaging of metallic foreign bodies in the orbit. Acta Ophthalmol Scand 78, 79-83, doi:10.1034/j.1600-0420.2000.078001079.x (2000).
7. Yuan WH, Hsu HC, Cheng HC, Guo WY, Teng MM, Chen SJ. et al. CT of globe rupture: analysis and frequency of findings. AJR Am J Roentgenol 202, 1100-1107, doi:10.2214/AJR.13.11010 (2014).
8. Bord, S. P. Linden, J. Trauma to the globe and orbit. Emerg Med Clin North Am 26, 97-123, vi-vii, doi:10.1016/j.emc.2007.11.006 (2008).
9. Dunkin, J. M., Crum, A. V., Swanger, R. S. & Bokhari, S. A. Globe trauma. Semin Ultrasound CT MR 32, 51-56, doi:10.1053/j.sult.2010.09.003 (2011).
10. Mohammad, A., Hefny, A. F. Abu-Zidan, F. M. Focused Assessment Sonography for Trauma (FAST) training: a systematic review. World J Surg 38, 1009-1018, doi:10.1007/s00268-013-2408-8 (2014).
11. Hassen, G. W. et al. Accuracy of optic nerve sheath diameter measurement by emergency physicians using bedside ultrasound. J Emerg Med 48, 450-457, doi:10.1016/j.jemermed.2014.09.060 (2015).
12. Hassen, G. W., Nazeer, O., Manizate, F., Patel, N. & Kalantari, H. The role of bedside ultrasound in pretherapeutic and posttherapeutic lumbar puncture in patient with idiopathic intracranial hypertension. Am J Emerg Med 32, 1298 e1293-1294, doi:10.1016/j.ajem.2014.03.028 (2014).
Fellow Section
Using Musculoskeletal Ultrasound to Improve Care in Fast-Track Areas
Thomas Easter, PA-C CAQ-EM and Melissa Myers, MD FAAEM
A 49-year-old male presents to your community ED complaining of atraumatic left shoulder pain progressively worsening for years. The patient denies any acute changes and states he has seen his primary care provider for this problem “at least twice”. He has been waiting over 9 months on approval for an MRI and feels he has been getting the run-around from his insurance and doctor. His chief complaint is “Need MRI.”
This is a common problem faced by Physicians and Advanced Practice Practitioners (APPs) working in fast track or urgent care environments. It can be frustrating for both the patient and the medical practitioner. Patients presenting with joint pain may have expectations which cannot be met in the ED.
One potential approach is to incorporate the use of point of care ultrasound (POCUS) into the care of these patients. Musculoskeletal POCUS can be used to evaluate for tendon strain, joint effusions, fractures and many other causes of joint pain. In addition, POCUS has been shown to improve patient satisfaction in the Emergency Department.1
Clinical ultrasound, as an adjunct to physical exam, has been proven to increase patient safety and satisfaction. The seemingly unrelated efforts to expand use of POCUS and to improve our patient centered metrics may find a common ground of high yield solutions in the relatively low acuity but often difficult patient problems. In many of our EDs those difficulties are faced primarily by those working in a fast-track or satellite urgent care. Identifying a few select point-of-care POCUS evaluations based on prior trends may result in a significant and rapid improvement in those pesky metrics. In this article, we will discuss using POCUS to evaluate shoulder and knee pain. The principles discussed here can be expanded to the evaluation of other joints.
POCUS can be used in the evaluation of joint pain, such as the shoulder and the knee. The principles discussed here can be applied to other joints, such as the elbow and ankle. POCUS can be used to evaluate the ligaments, tendons and shoulder joint through a thorough exam.2 We discuss one possible approach to evaluation of the shoulder joint here.
Evaluation of the Shoulder Joint
Depending on sonographer experience ultrasound can be up to 100% sensitive for full thickness rotator cuff tears and 91% sensitive for partial thickness tears.3 Shoulder pathology frequently presents as non-focal pain not well correlated to a specific location, making a focused ultrasound exam inadequate. Below is a 5-step, protocol driven, shoulder examination.3 This examination evaluates the long head of the biceps tendon, the tendinous attachments of the rotator cuff muscle group (subscapularis, supraspinatus, infraspinatus and teres minor), the acromioclavicular joint space, and the subacromial-subdeltoid bursa. The exam is performed with a high frequency linear probe.
Step 1. Evaluation of the long head of the biceps tendon, within and distal to the bicipital groove
With the patient seated with hand supinated on the ipsilateral thigh, place probe over humeral head to locate the bicipital groove (Figure 1 and 2). The long head of the biceps tendon rests within the groove and should appear hyperechoic. Angle probe cephalad to bring the ultrasound beam perpendicular to the tendon to resolve anisotropy.
After evaluating the tendon within the bicipital groove, rotate prone to long axis of the tendon and scan distally to evaluate for tears, tendinosis, tenosynovitis, and subacromial-subdeltoid bursa.
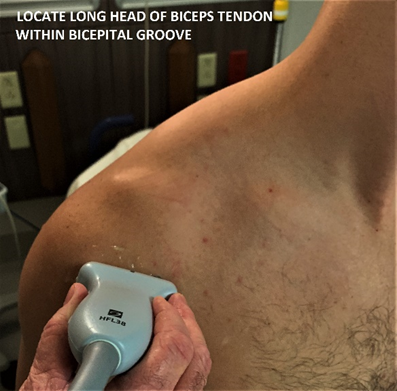
Figure 1 – Locating the long head of the biceps tendon
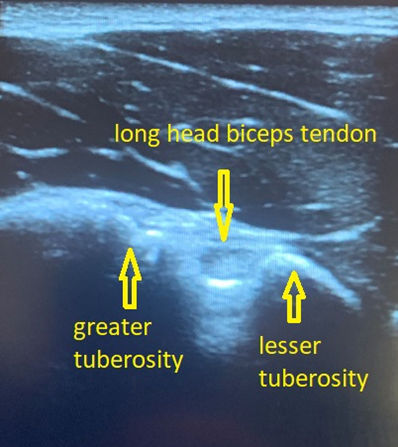
Figure 2 – Long head of the biceps tendon in a transverse view
Step 2. Evaluation of the subscapularis, evaluation for biceps tendon subluxation/dislocation
With the patient maintaining the same position relocate probe to its original location over the bicipital groove, then slide medially to center the lesser tuberosity in the screen. The subscapularis will appear anechoic. External shoulder rotation will move the lesser tuberosity laterally, pulling the subscapularis tendon fibers laterally into perpendicular orientation to the ultrasound beam, resolving anisotropy and resulting in normal fibrillar appearance of the tendon (Figure 3). While in shoulder rotation again evaluate that long head of the biceps tendon maintains its position within the bicipital groove. If present, transient subluxation or dislocation of this tendon will usually occur during external rotation. Scan inferiorly and superiorly to evaluate the subscapularis. Pay particular attention to the upper aspect of the subscapularis as this is where tears frequently occur when associated with supraspinatus tears. Then rotate the probe to scan through the subscapularis tendon in short axis.
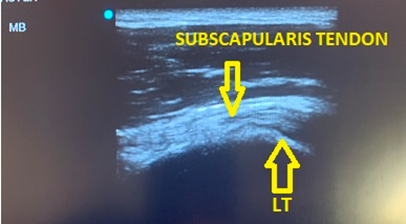
Figure 3 – Subscapularis with shoulder externally rotated to resolve anisotropy
Step 3. Evaluate the supraspinatus and rotator interval
Patient is seated in a modified Crass position (hand on posterolateral hip or buttock, with the elbow pointed posterior to the patient). In this position the long axis of the supraspinatus is at an oblique angle inferior and lateral to the acromio-clavicular joint. The probe is positioned to view the supraspinatus tendon in a long axis. Sweep from anterior to posterior. It is best to start anterior to the supraspinatus by first visualizing the biceps tendon in longitudinal view, from here sweep posteriorly through the supraspinatus. (Figure 4,5 and 6). After evaluation of the long axis is complete, rotate the probe counterclockwise 90 degrees to visualize the short axis. A smoothly rounded humeral head covered by a thin hypoechoic hyaline cartilage and fibrillar tendon indicates a correct short axis orientation. The anterior aspect of the supraspinatus faces medially. After the short axis evaluation is complete sweep the probe distally to the greater tuberosity in order to identify supraspinatus and infraspinatus pathology at the superior and middle facets.
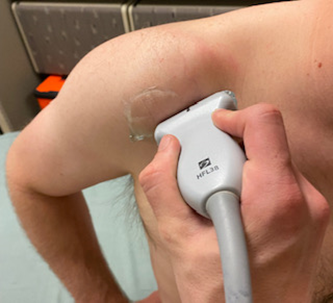
Figure 4 – probe position for long axis view of supraspinatus
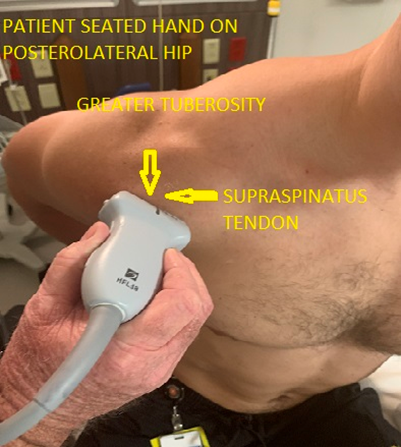
Figure 5 – Probe position, short axis supraspinatus
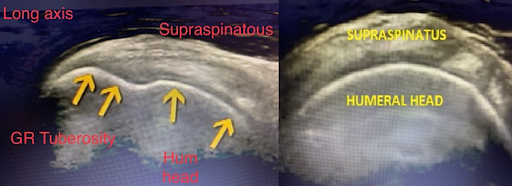
Figure 6 – Long axis supraspinatus (left) and short axis (right)
Step 4. Evaluate acromioclavicular joint, subacromial-subdeltoid bursa and subacromial impingement.
With the patient seated and their hand supinated on the ipsilateral thigh, palpate the distal clavicle to the acromioclavicular joint and place the probe in the coronal plane. (Figure 7) The acromioclavicular joint can be assessed for joint space widening, narrowing or offset. This can also be assessed dynamically by observing the joint space for widening or offset while the patient reaches for their contralateral shoulder. To assess for impingement, move the transducer laterally until the greater tuberosity and lateral acromion are in view and observe this space while the patient abducts the arm. During abduction the subacromial-subdeltoid bursa and the supraspinatus tendon should slide smoothly under the acromion and out of view. Pooling of bursa fluid, snapping of tissue and interposition of supraspinatus tendon are indication of impingement.
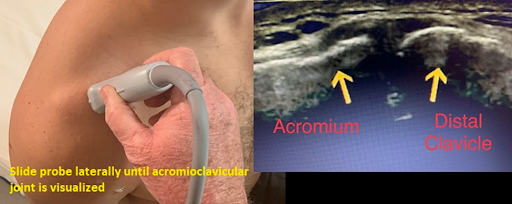
Figure 7 – Probe positioning and view of acromioclavicular joint
Step 5. Infraspinatus, teres minor and posterior labrum
With the patient seated and hand supinated on ipsilateral thigh, the transducer is placed over the posterior aspect of the greater tuberosity, just inferior to the scapular spine to view the infraspinatus in long axis as well as the labrum. Scanning from the greater tuberosity medially the sonographer can view the infraspinatus along its course, the posterior labrum and the glenohumeral joint recess. The transducer is then rotated 90 degrees to assess the infraspinatus in short axis. (Figure 8 and 9).
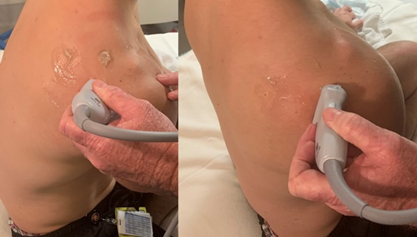
Figure 8 – Transducer position for infraspinatus, teres minor and posterior labrum
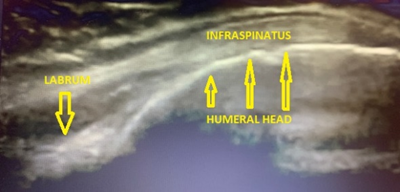
Figure 9 – View of the infraspinatus, posterior humeral head and labrum from coronal plane
This shoulder ultrasound exam can be viewed on YouTube at: https://www.youtube.com/watch?v=W_X5SmLE3gs
As opposed to a shoulder radiograph, this ultrasound protocol provides several points of relevant clinical data which will be more satisfying to the patient experience, better facilitate primary care providers referral and provide useful information to guide patient management.
Non-acute atraumatic knee pain
A 60-year-old female presented to the ED with an isolated complaint of atraumatic right knee pain which had been progressive for 3-4 weeks. There was no history or trauma, gout, rheumatoid arthritis, suspected nidus of infection or thromboembolic symptoms. Physical exam was notable for diffuse tenderness and swelling without erythema and no obvious effusion on palpation. Exam was obscured by body habitus. Bedside ultrasound revealed significant effusion (left) which was improved after arthrocentesis aspirating 20ml of straw colored non purulent fluid, which was sent for lab and culture. Following this procedure, the patient reported significant pain relief.
Knee ultrasound has limitations in that it is difficult to view the cruciate ligaments and meniscus.3 Limitations notwithstanding, ultrasound of the knee can evaluate several structures and pathologies to include injury to the patellar and quadriceps tendons and joint effusion.
Approach to Ultrasound of the Knee
Have the patient lie on a stretched with the leg outstretched. Place a high frequency linear probe over the patellar tendon with the probe marker oriented toward the head where the patellar tendon attaches to the patella. Move the probe from proximal to distal over the tendon and visualize the entire length of the tendon to the distal insertion. Next, place the probe at the site of the patellar insertion at the patella with the probe marker towards the patient’s right. Again, move the probe from proximal to distal until you have evaluated the entirety of the tendon. Repeat the process to evaluate the quadriceps tendon by placing the probe at the site of the quadriceps tendon on the patella and then moving the probe from distal to proximal and visualizing the tendon in both the long and short axes. (Figure 10 and 11)
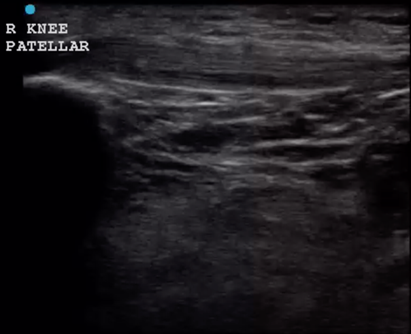
Figure 10 – Patellar tendon in long axis
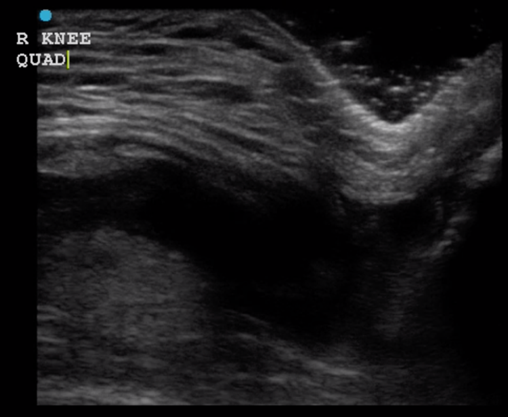
Figure 11 – Quadriceps Tendon Rupture
To evaluate for effusion, place the probe with the indicator towards the head over the medial distal aspect of the knee joint. Move the probe proximal. Repeat this process on the lateral side of the joint. (Figure 12)
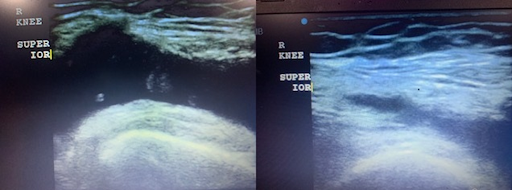
Figure 12 – Knee Effusion
Conclusion
Patient satisfaction, length of stay, waiting times are often difficult metrics do improve on in emergency care. Patient complaints are often driven by factors beyond the control of emergency department staff such as unrealistic expectations, ongoing frustration with out-patient care, underinsurance or chronic pain. At the same time, emergency fast tracks and urgent care areas are vulnerable to the risks of high volumes and rapid turnover. Clinical ultrasound can significantly improve patient satisfaction by adding a tangible and meaningful component to the physical exam while minimizing length of stay. At the same time, clinical ultrasound can quickly evaluate for serious but easily overlooked conditions such as rib fracture and pneumothorax without sending a patient out of the department for an x-ray.
References:
1. Howard ZD, Noble VE, Marill KA, et al. Bedside ultrasound maximizes patient satisfaction. The Journal of emergency medicine. 2014;46(1):46-53.
2. Gaitini D. Shoulder ultrasonography: performance and common findings. Journal of clinical imaging science. 2012;2.
3. Jon A Jacobson MD, Shoulder US, Aantomy, Technique, and Scanning Pitfalls, Radiology Vol 260 JUL 2011,
4. Noble VE, Nelson BP. Manual of emergency and critical care ultrasound. Cambridge University Press; 2011.
Education Section
Near Peer Ultrasound Teaching: A pilot program in ultrasound training in medical school
Katy Wyszynski, OMS-II, MS
Benjamin Saul, OMS-II
John Gibson, MD Ultrasound Director, University of North Texas Health Science Center
The model of near-peer teaching
With the recent advances in ultrasound technologies and the increased use of ultrasound across specialties, many medical schools across the United States have implemented ultrasound training into their curriculum. Based on a 2019 survey, 122 United States Accredited Medical Schools had an ultrasound curriculum1. Uniquely, Texas College of Osteopathic Medicine (TCOM) utilizes near-peer teaching for ultrasound education in pre-clinical years. Near-peer teaching involves more experienced students acting as instructors2. There are many rationales for utilizing a near-peer teaching in medical schools, perhaps foremost to relieve the demand on medical school faculty. As medical school class sizes have increased, as noted by the American Association of Medical Colleges (AAMC), the demands on faculty have subsequently increased. Implementation of near peer teaching allows for training and oversight of the student instructors by faculty, allowing the faculty more time and student instructors deeper learning3. In addition, near-peer teaching minimizes the cognitive distance between instructor and learner, allowing for a safe learning environment where students can make mistakes and learn from them3. Finally, this teaching method provides an opportunity for the student instructors to gain a deeper understanding of the material and a teaching opportunity. Allowing medical students to instruct underclassmen enhances their technical and teaching skills, which are valuable traits as they move into their clinical years and residency. Near-peer education and evaluation were the cornerstones of TCOM’s model in instructing and selecting ultrasound teaching assistants.
Training first-year medical students
In the spring semester of 2021, the Ultrasound Interest Group (USIG) at TCOM piloted a training program based in the near-peer training model. 2nd year medical students, who had self-selected as ultrasound teaching assistants (TAs) the prior year, taught the 1st year medical students ultrasound skills and clinical techniques.
After an orientation to the curriculum held via Zoom, 1st year students were instructed to complete Sonosim* modules prior to attending the in-person practice session. For instance, before our first sessions, students completed the heart and lung anatomy and physiology modules on the Sonosim website. These modules allowed student learners to review the anatomy, learn probe orientation, and instruction on how to obtain correct ultrasound views. Then the practice sessions were led by 2nd year medical students, as proposed by the near-peer teaching method, with the oversight of Dr. Gibson, Ultrasound Director (Table 1). Continuing in our heart and lung example, 2nd year students instructed 1st year learners to obtain a parasternal long, parasternal short, subxiphoid, and apical view of the heart and to evaluate lung sliding with ultrasound imaging.
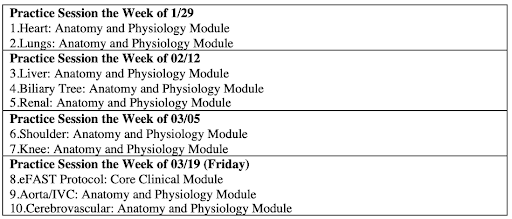
Table 1: Proposed schedule for ultrasound training with Sonosim modules
Ultrasound training spanned from January to April with a final evaluation of the student learners’ ability to ultrasound a standardized patient (Table 2). The ultrasound curriculum included cardiac, lung, liver, renal, shoulder, and knee views on ultrasound. In addition, there were opportunities for 1st year learners to practice ultrasound techniques outside of the classroom, a great benefit of the portable ultrasound probes (Figure 1). On average, learners spent 6 hours practicing ultrasound skills in person aside from the required completion of Sonosim modules.
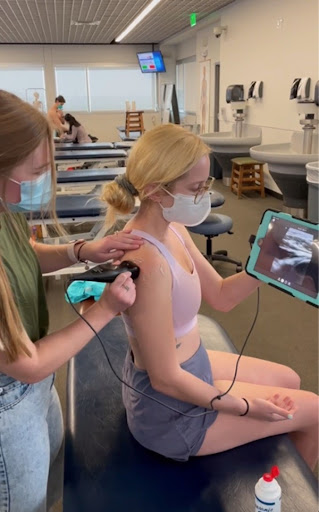
Figure 1: 1st year medical students practice shoulder ultrasound with Butterfly probes. Photo by Dr. John Gibson, shared with permission.
*Sonosim is an online ultrasound education platform with didactic courses and tools to track learners’ knowledge through assessments. Sonosim is included in tuition for first- and second-year medical students at UNTHSC
Evaluation of ultrasound skills
After completing 9 Sonosim modules with the associated mastery exam, and attending 4 mandatory ultrasound practice sessions, 1st-year medical students at UNTHSC were eligible for evaluation to become ultrasound teaching assistants. The evaluation format was modeled after the university’s objective structured clinical examination (OSCE). Students were evaluated by 4 categories including professionalism, technical skills, ultrasound image quality, and teaching skills. In utilizing the near-peer teaching model, 2nd year ultrasound TAs evaluated the 1st year learners. In the evaluation, students were given 7 minutes to identify and discuss the following structures and views on ultrasound:
- Bicipital groove
- Supraspinatus, subscapularis, infraspinatus tendons
- Acromioclavicular joint
- Glenoid rim and labrum
Ultimately, 41 students were selected to become TAs for the following academic year out of 70 students who performed the ultrasound evaluation. All TAs correctly identified all shoulder anatomy on ultrasound and were able to teach both the anatomy and ultrasound techniques. Ultrasound TAs will continue to utilize near-peer teaching in multiple courses in the pre-clinical curriculum.
Take home points:
- Utilize students as instructors to enhance learning opportunities in ultrasound.
- Plan a training curriculum well in advance to avoid conflicts and smoothly integrate ultrasound training into the schedule.
- Allow for ample practice time with ultrasound devices. As the learner practices more, their ultrasound skills and confidence level increases.
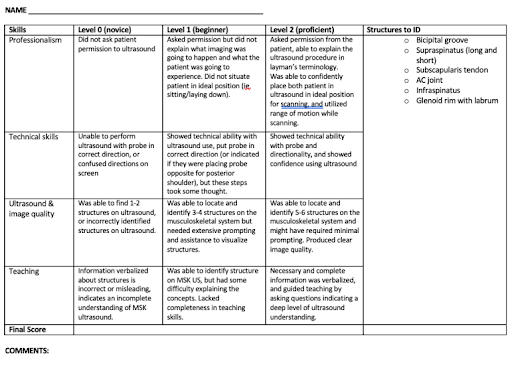
Table 2: 1st year learner demonstrating shoulder ultrasound during evaluation
References:
1. Nicholas E, Ly AA, Prince AM, Klawitter PF, Gaskin K, Prince LA. The Current Status of Ultrasound Education in the United States Medical Schools. Journal of Ultrasound Medicine. 2021.
2. Nelson AJ, Nelson SV, Linn AMJ, Raw LE, Kilsea HB, Tonkin AL. Tomorrow’s educators…today? Implementing near-peer teaching for medical students. Medical Teacher. 2012; 35(2), 156-159.
3. Cate OT, Durning S. Peer teaching in medical education: twelve reasons to move from theory to practice. Medical Teacher. 2007; 29(6), 591-599.
Ultrasound Guided Procedures
Ultrasound Guided Lateral Femoral Cutaneous Nerve Block for Meralgia Paresthetica
Matthew Apicella, DO, Chia-Yuan Michael Lee, DO and Michael Rosselli, MD
Background:
The lateral femoral cutaneous nerve (LFCN) is a branch of the lumbar plexus that originates from the lumbar spine and provides sensory innervation to the lateral thigh.1 Entrapment of this nerve can lead to meralgia paresthetica, a condition that results in numbness, paresthesia, and pain of the anterolateral thigh without muscle weakness.2 It was first described by Bernhardt in 1878 and later postulated to be due to nerve compression by Hager in 1885.2 Although the exact etiology of this condition is variable, pregnancy and obesity may predispose patients to this condition as well as mechanical factors such as seat belts and tight clothing.2 Treatment may include NSAIDs, avoidance of compression, numbing creams, or even nerve blocks.2
Blockade of the LFCN is particularly useful as it has the potential to be both diagnostic and therapeutic in the work up of meralgia paresthetica.2 Although the LFCN block may be performed solely using anatomical landmarks, this “blind” approach has failure rates as high as 60% and may result in inadvertent blockade of the femoral or obturator nerve as well as intra-abdominal puncture.3 The use of ultrasound (US) leads to more accurate identification of the target nerve and decreased amount of anesthetic required to achieve analgesia, thus reducing risk of systemic toxicity.3
Below, we discuss the case of a patient presenting with meralgia paresthetica and how a LFCN block was performed to treat his condition.
Case:
A 41 year-old male police officer presented with 2-3 weeks of a burning and shooting sensation of his right anterolateral thigh. He denied any trauma, back pain, change in urinary or bowel habits, or muscular weakness. He noted that he wore his belt with his service weapon pressed against his right thigh for over 12 hours a day. Physical exam revealed no weakness on strength testing. He reported increased sensation when the anterolateral surface of his right thigh was gently brushed. A diagnosis of meralgia paresthetica was made and a LFCN block was performed which significantly decreased the patient’s symptoms.
Performing the LFCN Block:
Understanding the anatomical course of the LFCN is essential to performing this technique. As the LFCN exits the spinal cord, it travels inferiorly on the lateral aspect of the psoas muscle before crossing over the iliacus muscle.4 The nerve then passes below or through the inguinal ligament to enter the thigh compartment, running between the sartorius muscle and tensor fascia latae muscle.4 Identification of the sartorius muscle and the tensor fasciae latae muscle is important in locating the LFCN.
To perform the block, the patient should be in the supine position and appropriately undressed such that the target lower extremity is exposed. The ultrasound machine should be placed so that it is in the direct line of sight of the operator. A high frequency (>10MHz) linear array transducer should be selected for performing this block.5
The skin should be prepared in a sterile fashion, and the anterior superior iliac spine (ASIS) should be identified via palpation. The lateral end of the transducer should then be placed on the ASIS with the medial end angled caudally such that the probe is parallel to the inguinal ligament. 5
From here, the operator should scan caudally and medially and try to identify the tensor fasciae latae muscle and the sartorius muscle. Upon recognition of these muscles, the operator should then search for the LCFN which will appear as a “honeycomb-like” structure.5 After identifying the LFCN, the needle should be inserted in-plane to the probe from a lateral to medial direction. A “pop” may be appreciated as the needle punctures the plane between the two muscles. As the needle approaches the nerve, the operator can inject the anesthetic to surround the nerve.
Images:
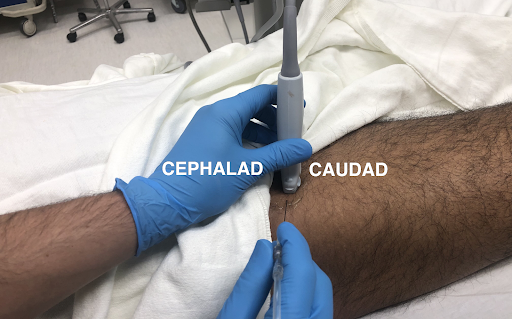
Image 1: Positioning of probe and needle for an in-plane approach to the LFCN block
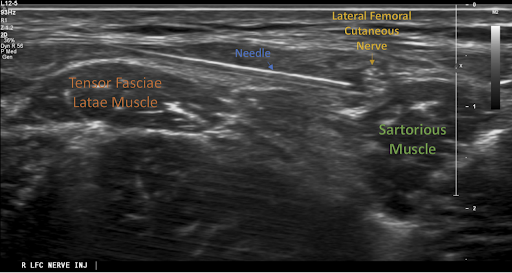
Image 2: Ultrasound image of an in-plane approach to the LFCN block
Discussion:
Traditionally, the LFCN block was performed by inserting a needle medially and caudal to the ASIS, spreading the anesthetic out in a fan-like fashion to provide a field block.5 This approach had a low success rate in part due to variability in the anatomic course of the LFCN.5 Studies have shown that the LFCN can range from 3mm to 7.3 cm away from the ASIS and even lateral to the ASIS in some cases.5
Ng et al. demonstrated that the use of US improved accuracy of locating the LFCN as they noted an accuracy of 84.2% with US as compared to 5.3% with the blind anatomic approach in a cadaver study.6
As ultrasound allows for visualization of the nerve and surrounding structures, blocks under ultrasound guidance are superior to the blind anatomic approach. In a case series of the LFCN for meralgia paresthetica, Hurdle et al. were able to visualize and achieve blockade of the LFCN for all their patients, including a patient with a BMI as high as 43 kg/m2.5 Furthermore, they were able to successfully achieve pain control using anesthetic volumes less than traditionally suggested.5
Although emergency department clinicians may be hesitant to perform this block due to time constraints, Zhu et al. demonstrated that the LFCN can be readily identified in an average of 7 seconds when using ultrasound and identifying the sartorius and tensor fasciae latae muscle as the initial sonographic landmarks.4
As seen in our patient and evidenced by literature, the LFCN block under US guidance can be a relatively quick, accurate, and effective diagnostic and therapeutic tool for patients with meralgia paresthetica.
References:
1. Cook JL, Cook J. The lateral femoral cutaneous nerve block. Dermatol Surg. 2000;26(1):81-83. doi:10.1046/j.1524-4725.2000.99159.x
2. Grossman MG, Ducey SA, Nadler SS, Levy AS. Meralgia paresthetica: diagnosis and treatment. J Am Acad Orthop Surg. 2001;9(5):336-344.
3. Kim JE, Lee SG, Kim EJ, Min BW, Ban JS, Lee JH. Ultrasound-guided Lateral Femoral Cutaneous Nerve Block in Meralgia Paresthetica. Korean J Pain. 2011;24(2):115-118. doi:10.3344/kjp.2011.24.2.115
4. Zhu J, Zhao Y, Liu F, Huang Y, Shao J, Hu B. Ultrasound of the lateral femoral cutaneous nerve in asymptomatic adults. BMC Musculoskelet Disord. 2012;13:227. doi:10.1186/1471-2474-13-227
5. Hurdle MF, Weingarten TN, Crisostomo RA, Psimos C, Smith J. Ultrasound-guided blockade of the lateral femoral cutaneous nerve: technical description and review of 10 cases. Arch Phys Med Rehabil. 2007;88(10):1362-1364. doi:10.1016/j.apmr.2007.07.013
6. Ng I, Vaghadia H, Choi PT, Helmy N. Ultrasound imaging accurately identifies the lateral femoral cutaneous nerve. Anesth Analg. 2008;107(3):1070-1074. doi:10.1213/ane.0b013e31817ef1e5
Ultrasound Saves
Point-of-Care Ultrasound (POCUS) for Abdominal Wall Tumor
Loyal Farley D.O., Dan Brillhart M.D., Chelsea Ausman M.D.
Introduction
Utilization of Point-of-Care Ultrasound to further characterize a large undifferentiated abdominal wall mass.
Case Presentation
A 31 year old female G2P2 2 months status post cesarean section presented to the Emergency Department (ED) for a right sided abdominal mass which for the last 3 weeks has been increasing in size and causing worsening and more frequent pain. Patient states the mass has been present since December of 2020 and that she was told it was a likely fibroid at her 6 week post op evaluation. Patient rates the current pain as mild but states that intermittently it is severe and causes her to assume a fetal position for relief. Patient denies any heavy menstrual periods and had her first menstrual period since delivery two weeks prior. Patient has had one other cesarean section in 2019 but denies any significant family history. Patient denies any fevers, chills, or night sweats but given recent delivery has had significant weight changes.
Vitals signs upon presentation and throughout stay in the ED were within normal limits. Patient’s physical exam shows a well appearing female in no acute distress with normoactive bowel sounds with large right sided abdominal mass extending superiorly to 2 cm below the right inferior costal margin and inferiorly to the anterior superior iliac spine medially to the linea alba and laterally to the anterior axillary line. Patient grimaces with palpation of mass. Point-of-Care ultrasound (POCUS) shows heterogenous mass with multiple areas of vascularity and streak artifact.
CT imaging showed a well contained mass within rectus abdominus on the right without local invasion and no lymphadenopathy on CT. The patient subsequently underwent biopsy with results showing a spindle cell lesion with patchy hyalinized/collagenous stroma with final characterization pending.
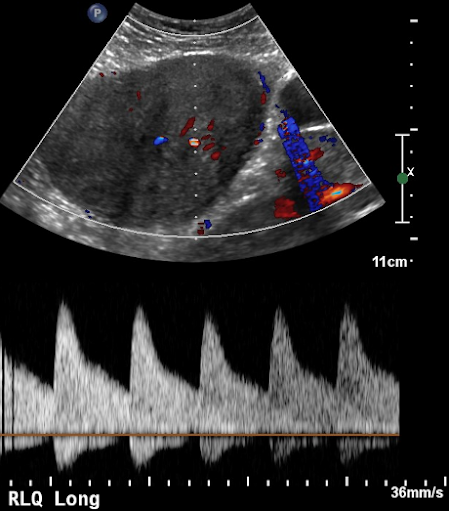
Figure 1: Ultrasound image showing vascularity
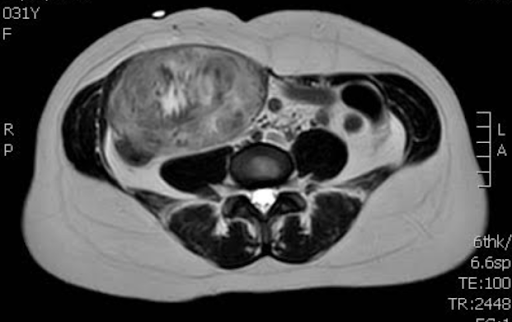
Figure 2: MRI showing heterogenous texture
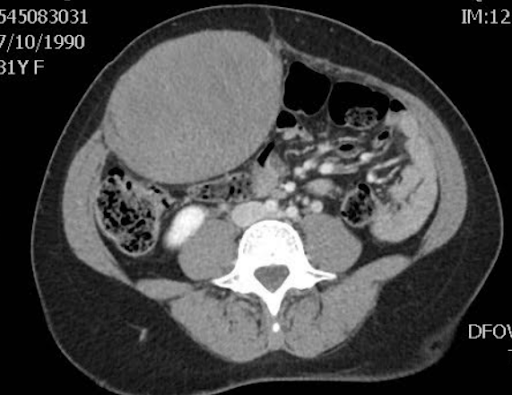
Figure 3: CT showing location and relative size
Discussion
Abdominal wall masses are a diverse group encompassing benign and malignant pathologies.1 Ultrasound is beneficial to characterize these masses given the superficial nature of many of these tumors, availability, and reduced radiation exposure.1 Many of benign abdominal wall tumors are easily characterized using POCUS including: abscess, hernia, lipoma, and hematoma. Given the close temporal association of the above patient’s cesarean section and the location of the mass hematoma was high on the differential until considerable vascularity was noted throughout the tumor.
The patient’s age, gender, tumor location and recent delivery made another uncommon soft tissue tumor a possibility. Desmoid tumors account for less than 0.03% of all tumors and less than 3% of all soft tissue tumors.2 They are histologically benign and generally occur in fertile females between 25-40 years of age and 50% of the time are located in the abdominal wall.2 Desmoid tumors have between a 5-15% association with Familial Adenomatous Polyposis and Gardner Syndrome especially lesions within the abdominal wall. However without family history of these diseases the incidence of discovering an association drops to between 4-5% making screening after initial occurrence of low utility.3 Desmoid tumors on average grow between 5-15 cm and have a wide range of recurrence after resection 20-77% but reduced to 20-30% for abdominal wall tumors. Histologically these tumors demonstrate three stages of evolution making their appearance on imaging generally heterogenous and varied however they are spindle cell tumors with collagen.2
Another more malignant consideration for a female between the ages of 30-40 included a leiomyosarcoma. This tumor originates from the myometrium and spreads hematogenously to the lung, thyroid, liver, brain, bone, and skeletal muscle. Accounting for fewer than 5% of soft tissue sarcomas and 1.3% of all uterine malignancies. These tumors are aggressive and metastasize and recur frequently giving a 5 year survival for stage 1 of 53% and of stages II-IV of 8%. These tumors are also spindle cell tumors which demonstrate nuclear atypia which was not mentioned by the pathologists in the above case report.4
The above differentials are not an all-encompassing list of abdominal wall tumors. Many abdominal wall tumors were identified as less likely after ultrasound and CT imaging showed lesions to be inconsistent with lipoma, lipomyosarcoma, dermatofibrosarcoma protuberans, hemangioma, schwannoma, neurofibroma, or lymphoma. The final diagnosis of this tumor is still pending with the top differentials listed above.
Conclusion
Point-of-care ultrasound is a quick and effective means to narrow your differential on a diverse group of abdominal wall tumors.
Consent
Written informed consent was obtained from the patient for publication of this case report and accompanying images. A copy of the written consent is available for review.
References:
1. Li M, Zhang L, Xu XJ, Shi Z, Zhao XM. CT and MRI features of tumors and tumor-like lesions in the abdominal wall. Quant Imaging Med Surg. 2019;9(11):1820-1839. doi:10.21037/qims.2019.09.03
2. Economou, A., Pitta, X., Andreadis, E. et al. Desmoid tumor of the abdominal wall: a case report. J Med Case Reports 5, 326 (2011). https://doi.org/10.1186/1752-1947-5-326
3. UpToDate. (n.d.). Retrieved November 19, 2021, from https://www.uptodate.com/contents/desmoid-tumors-epidemiology-risk-factors-molecular-pathogenesis-clinical-presentation-diagnosis-and-local-therapy?search=abdominal+wall+tumor&source=search_result&selectedTitle=1~150&usage_type=default&display_rank=1.
4. Güngör T, Akbay S, Aksüt H, Yılmaz B. Rectus abdominalis muscle metastasis from uterine leiomyosarcoma: An unusual case and review of the literature. J Turk Ger Gynecol Assoc. 2014;15(2):122-124. Published 2014 Jun 1. doi:10.5152/jtgga.2014.53533
